Jimenez Pre-Golf Workout

Exercise Overview

Exercise Instructions

Dynamic Side Bends demonstration

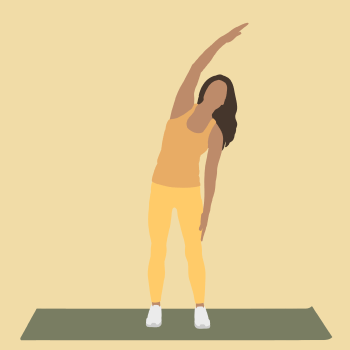
1. Dynamic Side Bends

Instructions

  • Start from a standing position with your feet hip-width apart and your arms at your sides.
  • Reach one arm overhead while bending your torso to the opposite side.
  • Return to the starting position and repeat on the other side, alternating sides dynamically.

Tips

  • Engage your core to avoid overextending your lower back.
  • Keep your movements smooth and steady.
  • Focus on lengthening through the side of your body as you bend.

Modifications

  • Reduce the depth of the side bend if flexibility is limited.
  • Perform the movement more slowly to maintain better control.

Benefits

  • IT Band, Obliques, Shoulders, Core, Abdomen
Trunk Twist demonstration

2. Trunk Twist

Instructions

  • Start from a standing position with your feet hip-width apart and your arms extended out to the sides at shoulder height.
  • Engage your core and gently twist your upper body to one side.
  • Turn your head to look over your shoulder in the direction of the twist.
  • Return to the starting position and repeat on the other side.

Tips

  • Keep your knees slightly bent and your hips facing forward throughout the movement.

Modifications

  • For less intensity, keep your arms bent with hands on your hips.

Benefits

  • Knees, Spine, IT Band, Obliques, Shoulders, Hips, Lower Back, Lats, Abdomen
Wide Leg Toe Touches demonstration

3. Wide Leg Toe Touches

Instructions

  • Start from a standing position with a wide stance and your hands in front of you.
  • Bend at your waist and reach both hands toward one of your feet to touch your toes.
  • Return to standing and repeat the movement on the other side, alternating dynamically.
  • Move smoothly, focusing on a controlled movement.

Tips

  • Engage your core to support your back and maintain balance.
  • Keep your knees slightly bent to avoid overextending your hamstrings.

Modifications

  • Touch your shins or knees if reaching your toes is difficult.

Benefits

  • Calves, Obliques, Hips, Hamstrings, Core, Lower Back
High Knee Twists demonstration

4. High Knee Twists

Instructions

  • Start from a standing position with your feet hip-width apart and your hands behind your head.
  • Lift one knee towards your chest while twisting your torso towards the lifted knee.
  • Lower your leg and return to the starting position before switching sides.
  • Continue alternating legs in a controlled, dynamic motion.

Tips

  • Focus on controlled movements rather than speed for better form.
  • Focus on keeping your torso upright to maintain balance.
  • Coordinate your twist and knee lift for fluid motion.

Modifications

  • Reduce the height of the knee lift if flexibility is limited.

Benefits

  • Obliques, Hips, Core
Standing Hip Openers demonstration

5. Standing Hip Openers

Instructions

  • Start from a standing position with your feet hip-width apart and your arms at your sides.
  • Lift one foot off the floor, grabbing it with the opposite-side hand, and pull it up, allowing your knee to point outward.
  • Release and return to standing before repeating on the other leg.
  • Alternate sides dynamically in a controlled motion.

Tips

  • Focus on keeping your torso upright to maintain balance.
  • Move slowly and with control to avoid over-rotating your hip.
  • Keep your standing knee slightly bent for stability.

Modifications

  • Hold onto a wall or chair for added support.
  • Keep your range of motion smaller if flexibility is limited.

Benefits

  • Hips, Glutes
Dynamic Chest Flys demonstration

6. Dynamic Chest Flys

Instructions

  • Start from a standing position with your feet hip-width apart and your arms bent at 90 degrees, elbows at shoulder height, and fingers pointing upward.
  • Bring your elbows and forearms together in front of your chest, keeping them bent at 90 degrees.
  • Return to the starting position and repeat the movement in a controlled, fluid rhythm.

Tips

  • Focus on squeezing through your chest as you bring your arms together.
  • Keep your shoulders relaxed and avoid shrugging them.

Modifications

  • Perform the movement more slowly for better control.
  • Reduce the range of motion if shoulder discomfort occurs.

Benefits

  • Shoulders, Chest
Cat Cow demonstration

7. Cat Cow

Instructions

  • Start on your hands and knees in the tabletop position.
  • Align your wrists under your shoulders and your knees under your hips.
  • Inhale, dropping your belly towards the floor and arching your back, and lifting your chin and chest to look up toward the ceiling.
  • Exhale, drawing your belly up toward your spine and rounding your back, and tucking your chin to your chest.

Tips

  • Move slowly between the poses, coordinating each movement with your breath.

Modifications

  • If you have neck issues, keep your head in a neutral position rather than lifting and tucking your chin.

Benefits

  • Spine, Neck, Upper Back, Lower Back, Abdomen
Upward Dog demonstration

8. Upward Dog

Instructions

  • Start lying on your stomach with your legs extended and your hands under your shoulders.
  • Press your palms into the floor, straightening your arms to lift your upper body and legs off the floor.
  • Lift your chest, relax your shoulders, and look slightly upward.

Tips

  • Only the tops of your feet and your palms should be touching the floor.
  • Keep your arms straight but avoid locking your elbows.

Modifications

  • For less intensity, keep your thighs on the floor.

Benefits

  • Psoas, Spine, Chest, Abdomen
Child's Pose demonstration

9. Child's Pose

Instructions

  • Start on your hands and knees in a tabletop position.
  • Widen your knees and bring your big toes together so they're touching.
  • Sit back on your heels, then reach forward with your hands and lower your chest toward the floor.
  • Relax your hips and rest your forehead on the floor.

Tips

  • Walk your fingertips forward to increase the stretch.
  • Allow your chest to sink towards the floor.

Modifications

  • For less intensity, don't spread your knees as wide.
  • If your forehead doesn't reach the floor, rest it on a block or folded blanket.

Benefits

  • Feet, Shins, Shoulders, Hips, Lower Back, Ankles
Downward Dog demonstration

10. Downward Dog

Instructions

  • Start on your hands and knees in a tabletop position.
  • Tuck your toes under, press your palms into the floor, and straighten your arms and legs to lift your hips up and back.
  • Push your chest toward your thighs and your heels toward the floor.

Tips

  • Relax your shoulders and let your head hang between your arms.
  • Distribute your weight evenly between your hands and feet.
  • Keep a slight bend in your knees to avoid hyperextension

Modifications

  • For less intensity, bend your knees more or place your hands on the edge of a chair.
  • To reduce pressure on your wrists, place your forearms on the floor or use a block under your hands.

Benefits

  • Calves, Shoulders, Hamstrings, Lower Back, Glutes
Seated Fold demonstration

11. Seated Fold

Instructions

  • Start on the floor in a seated position with your legs extended in front of you.
  • Extend your arms overhead to lengthen your spine.
  • Hinge at your hips and reach forward to grab your toes.

Tips

  • Keep your back flat and avoid rounding your spine.

Modifications

  • If reaching your toes is difficult, place your hands on your shins or use a strap around your feet.
  • Keep a slight bend in your knees if you have tight hamstrings.

Benefits

  • Calves, Spine, Upper Back, Shoulders, Hamstrings, Lower Back
Lying Hamstring demonstration

12. Lying Hamstring

Instructions

  • Start lying on your back with your knees bent and your feet flat on the floor.
  • Lift one leg straight up towards the ceiling while keeping your other foot flat on the floor.
  • Place your hands behind the thigh or calf of your raised leg and gently pull it towards your chest.

Tips

  • Keep your hips and lower back pressed into the floor.
  • Maintain a slight bend in the knee of your raised leg to avoid hyperextension.

Modifications

  • Use a yoga strap or towel looped around your foot if you can't reach your leg.

Benefits

  • Hamstrings, Lower Back, Glutes
Happy Baby demonstration

13. Happy Baby

Instructions

  • Start lying on your back with your knees bent and feet flat on the floor.
  • Lift your feet off the floor to bring your knees towards your armpits.
  • Grasp the outer edges of your feet with your hands and gently pull your knees towards the floor.

Tips

  • Keep your lower back pressed into the floor.
  • Relax your shoulders and neck.

Modifications

  • If you can't reach your feet, hold onto your ankles or calves instead.

Benefits

  • Groin, Hips, Hamstrings, Lower Back, Glutes